Nginx@Web系ミドルウェア
はじめに
本サイトにつきまして、以下をご認識のほど宜しくお願いいたします。
01. Nginxの仕組み
アーキテクチャ

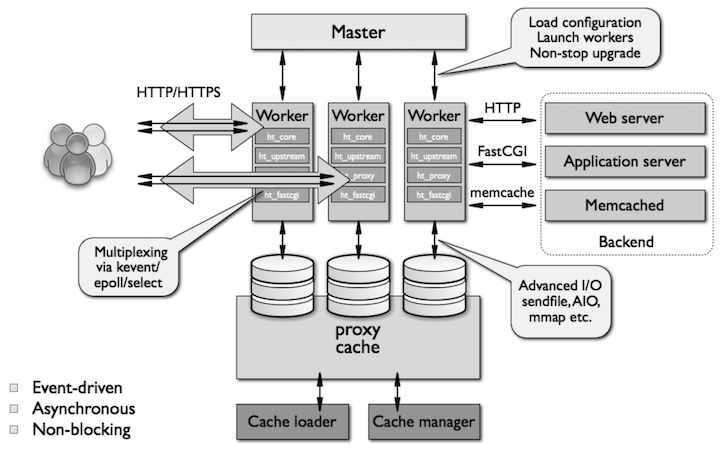
Nginxは、マスタープロセス、ワーカープロセス、プロキシキャッシュストレージ、キャッシュローダー、キャッシュマネージャー、といったコンポーネントから構成される。
Nginxの起動時に最初にマスタープロセスが実行され、Nginxに設定を適用する。
また、マスタープロセスは子プロセスとしてのワーカープロセスを実行し、各ワーカープロセスがリクエストを並列的に処理する。
ワーカープロセスは、キャッシュローダーを使用して、静的ファイル (例:htmlファイル、cssファイル、画像、動画、メールなど) のキャッシュをメモリ上のプロキシキャッシュストレージに保管し、一方で保管したキャッシュを取得する。
キャッシュマネージャは、保管したキャッシュの有効期限を管理する。
Radix Treeアルゴリズム
Nginxは、リクエストのIPアドレスを照合して、リクエストを許可/拒否する。
この時、Radix Treeアルゴリズムに基づいて、IPアドレスを高速で照合している。
モジュール
▼ 静的モジュール
静的モジュールは、ビルド後にNginxのバイナリに組み込む必要がある。
必要不要かにかかわらず、Nginxと一緒に強制的に実行する必要がある。
▼ 動的モジュール
動的モジュールは、ビルド後にNginxのバイナリに組み込む必要がない。
必要な場合にのみインストールし、また実行すればよい。
動的モジュールは、load_moduleディレクティブで読み込む。
load_module modules/<動的モジュール名>.so;
執筆時点 (2024/03/12) では、以下の動的モジュールがあらかじめインストールされている。
それ以外の動的モジュール (nginx-module-otel) はインストールする必要がある。
$ ls /etc/nginx/modules

ngx_http_geoip_module.so
ngx_http_js_module-debug.so
ngx_http_xslt_filter_module.so
ngx_stream_js_module-debug.so
ngx_http_image_filter_module-debug.so
ngx_http_js_module.so
ngx_stream_geoip_module-debug.so
ngx_stream_js_module.so
ngx_http_geoip_module-debug.so
ngx_http_image_filter_module.so
ngx_http_xslt_filter_module-debug.so
ngx_stream_geoip_module.so
Graceful Process
▼ Graceful Drain
▼ Graceful Shutdown
STOPSIGNAL SIGQUIT
02. ユースケース
リバースプロキシのミドルウェアとして
▼ 構成
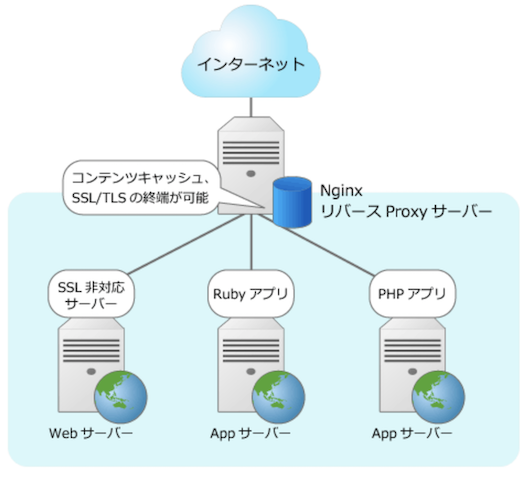
Nginxを配置し、リクエストをWebサーバーにルーティングする。
リバースプロキシのミドルウェアとして使用する場合、Nginxをパブリックネットワークに公開しさえすれば、パブリックネットワークからNginxを介して、後段のWebサーバーにリクエストを送信できるようになる。
▼ HTTP/HTTPSプロトコルの場合
Nginxは、HTTP/HTTPSリクエストをルーティングする。
また、Appサーバーからのレスポンスの返信データが静的ファイルであった場合、これのキャッシュをプロキシキャッシュストレージに保管する。
以降に同じ静的ファイル (例:htmlファイル、cssファイル、画像、動画、メールなど) に関するインバウンド通信があった場合、NginxはAppサーバーにルーティングせずに、保管したキャッシュを取得し、レスポンスとして返信する。

*実装例*
#-------------------------------------
# HTTPリクエスト
#-------------------------------------
server {
    server_name example.com;
    listen 80;
    return 301 https://$host$request_uri;

    #-------------------------------------
    # 静的ファイルであればNginxでレスポンス
    #-------------------------------------
    location ~ ^/(images|javascript|js|css|flash|media|static)/ {
        root /var/www/foo/static;
        expires 30d;
    }

    #-------------------------------------
    # 動的ファイルであればWebサーバーにルーティング
    #-------------------------------------
    location / {
        proxy_pass $scheme://$host$request_uri;
    }
}
*実装例*
もし分散トレースを採用する場合、マイクロサービス間でトレースコンテキストを伝播する必要がある。
クライアント/サーバー側のリバースプロキシでトレースコンテキストを伝播できるようにする。
サービスメッシュツール (例:Istio) を使用すれば、これのサイドカープロキシが宛先のコンテナにトレースコンテキストを伝播してくれるが、Nginxであれば自前で実装する必要がある。
# クライアント側
http {
    # $_request_id
    log_format  main  '$remote_addr - $remote_user [$time_local] "$request_uri" '
                      '$status $body_bytes_sent "$http_referer" '
                      '"$http_user_agent" "$http_x_forwarded_for" "$_request_id"';

    server {

        listen 80;

        # REQUEST-IDからリクエストIDを取得する
        set $tmp $request_id;

        # X-REQUEST-IDヘッダーにトレースIDがあれば、リクエストIDを上書きする
        if ($http_x_request_id) {
            set $tmp $http_x_request_id;
        }

        access_log logs/access.log  main;

        location / {
            proxy_pass $scheme://$host$request_uri;
            # X-REQUEST-IDヘッダーにトレースIDを設定し、リクエスト送信する
            proxy_set_header X-Request-ID $tmp;
        }
    }
}
# サーバー側
http {
    # $_request_id を参照する
    log_format  main  '$remote_addr - $remote_user [$time_local] "$request_uri" '
                      '$status $body_bytes_sent "$http_referer" '
                      '"$http_user_agent" "$http_x_forwarded_for" "$_request_id"';

    server {

        listen 80;

        # REQUEST-IDからリクエストIDを取得する
        set $tmp $request_id;

        # X-REQUEST-IDヘッダーにトレースIDがあれば、リクエストIDを上書きする
        if ($http_x_request_id) {
            set $tmp $http_x_request_id;
        }

        access_log logs/access.log  main;

        location = /server {
            echo "This is server side";
        }
    }
}
▼ FastCGIプロトコルの場合

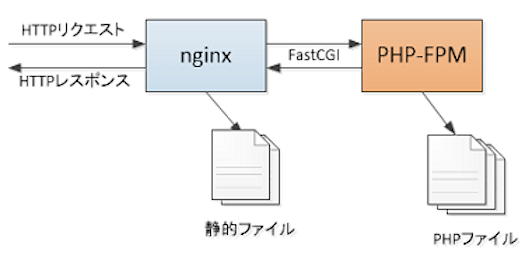
PHP-FPMはFastCGIプロトコルでリクエストを受信するため、これに変換する必要がある。
静的ファイル (例:htmlファイル、cssファイル、画像、動画、メールなど) のインバウンド通信が送信されてきた場合、Nginxはそのままレスポンスを返信する。
動的ファイルのインバウンド通信が送信されてきた場合、Nginxは、FastCGIプロトコルを介して、PHP-FPMにインバウンド通信をリダイレクトする。
# 設定ファイルのバリデーション
$ php-fpm -t
*実装例*
http {

    #-------------------------------------
    # HTTPリクエスト
    #-------------------------------------
    server {
        listen      80;
        server_name example.com;
        root        /var/www/foo/public;
        index       index.php index.html;

        include /etc/nginx/default/nginx.conf;

        #『/』で始まる全てのインバウンド通信の場合
        location / {
            try_files $uri $uri/ /index.php?$query_string;
        }

        #--------------------------------------------------
        # インバウンド通信をFastCGIプロトコルでルーティングする。
        # OSによって、fastcgi_paramsファイルの必要な設定が異なる
        #--------------------------------------------------
        location ~ \.php$ {
            # ルーティング先のTCPソケット
            fastcgi_pass   127.0.0.1:9000;
            # もしくは、Unixドメインソケット
            # fastcgi_pass unix:/run/php-fpm/www.sock;

            # ルーティング先のURL (rootディレクティブ値+パスパラメータ)
            fastcgi_param  SCRIPT_FILENAME $document_root$fastcgi_script_name;

            # 設定ファイルからデフォルト値を読み込む
            include        fastcgi_params;
        }
    }
}
▼ gRPCプロトコルの場合
Nginxは、HTTP/HTTPS/gRPCリクエストをgRPCとしてルーティングする。
stream {

    server {

        listen 8080 ssl http2;
        server_name host.docker.internal;

        ssl_certificate /ssl/localhost+1.pem;
        ssl_certificate_key /ssl/localhost+1-key.pem;
        ssl_protocols TLSv1.2 TLSv1.3;
        ssl_prefer_server_ciphers on;

        access_log /dev/stdout;
        error_log /dev/stderr debug;


        location ~ \.(html|js)$ {
            root /var/www/html;
        }

        # HTTPSリクエストをマッチングする
        location / {
            grpc_set_header Content-Type application/grpc;
            # gRPCサーバーにルーティングする
            grpc_pass grpc://localhost:50051;
        }

        # gRPCリクエストをマッチングする
        location /hello.HelloService/Hello {
            grpc_set_header Content-Type application/grpc;
            # gRPCサーバーにルーティングする
            grpc_pass grpc://localhost:50052;
            include common/cors.conf;
        }
    }
}
フォワードプロキシのミドルウェアとして
▼ 構成
フォワードプロキシのミドルウェアとして使用できる。
クライアントサイドにNginxを配置し、リクエストを外部ネットワークにルーティングする。
▼ HTTP/HTTPSプロトコルの場合
worker_processes  1;

events {
    worker_connections  1024;
}

http {
    include       mime.types;
    default_type  application/octet-stream;

    sendfile        on;

    keepalive_timeout  65;

    server {
        listen                         3128;

        proxy_connect;
        proxy_connect_allow            443 563;
        proxy_connect_connect_timeout  10s;
        proxy_connect_read_timeout     10s;
        proxy_connect_send_timeout     10s;

        # 受信したリクエストを外部ネットワークにルーティングする。
        location / {
            proxy_pass $scheme://$host$request_uri;
            proxy_set_header Host $host;
            proxy_set_header X-Forwarded-Proto $scheme;
            proxy_set_header X-Forwarded-For $proxy_add_x_forwarded_for;
            proxy_set_header X-Forwarded-Port $remote_port;
        }
    }
}
L4/L7ロードバランサ-のミドルウェアとして
▼ L7ロードバランサーの場合 (実装がかなり複雑になる)
L7ロードバランサーとして使用できる。
Nginxは、HTTPプロコトルのインバウンド通信を複数のWebサーバーに負荷分散的に振り分ける。
受信した通信がHTTPプロトコルであった場合、HTTPSリクエストにリダイレクトすると良い。
また、HTTPSプロトコルであれば、HTTPに変換してルーティングすると良い。
ただし、HTTPSリクエストを受信するために、Nginxにサーバー証明書を設定する必要がある。
*実装例*
http {

    # IPアドレスを定期的に取得する
    resolver <DNSサーバーのIPアドレス> valid=5s;

    # これで合ってるのかわからない...
    upstream backend {
        # 宛先のIPアドレスを動的に決める
        server unix:/var/run/ip_addresses.sock weight=9 max_fails=1 fail_timeout=20s;
    }

    #-------------------------------------
    # HTTPリクエスト
    #-------------------------------------
    server {
        server_name example.com;
        listen 80;
        # リダイレクト
        return 301 https://$host$request_uri;
    }

    #-------------------------------------
    # HTTPSリクエスト
    #-------------------------------------
    server {
        server_name example.com;
        listen unix:/var/run/rds_1a_001.sock;
        index index.php index.html;

        #-------------------------------------
        # SSL
        #-------------------------------------
        ssl on;
        ssl_certificate /etc/nginx/ssl/server.crt;
        ssl_certificate_key /etc/nginx/ssl/server.key;
        add_header Strict-Transport-Security "max-age=86400";

        # IPアドレスを動的に設定する
        listen unix:/var/run/ip_addresses.sock;
        set $ip_addresses "example.com";

        location / {
            proxy_pass $scheme://$ip_addresses;
            proxy_set_header Host $host;
            proxy_set_header X-Forwarded-Proto $scheme;
            proxy_set_header X-Forwarded-For $proxy_add_x_forwarded_for;
            proxy_set_header X-Forwarded-Port $remote_port;
        }
    }
}
▼ L4ロードバランサーの場合 (実装がかなり複雑になる)
Nginxは、TCPスリーウェイハンドシェイクを複数のサーバーにTCPプロトコルのまま負荷分散的に振り分ける。
L4ロードバランサーのため、宛先のサーバーでTCPプロトコルをHTTPプロトコルに変換するように処理しなければならない。
*実装例*
#-------------------------------------
# TCPスリーウェイハンドシェイク
#-------------------------------------
stream {
    error_log /var/log/nginx/stream.log info;
    proxy_protocol on;

    # IPアドレスを定期的に取得する
    resolver <DNSサーバーのIPアドレス> valid=5s;

    # これで合ってるのかわからない...
    upstream backend {
        # 宛先のIPアドレスを動的に決める
        server unix:/var/run/ip_addresses.sock weight=9 max_fails=1 fail_timeout=20s;
    }

    server {

        # IPアドレスを動的に設定する
        listen unix:/var/run/ip_addresses.sock;
        set $ip_addresses "example.com";

        location / {
            proxy_pass $scheme://$ip_addresses;
        }
    }
}
APIゲートウェイとして
▼ APIゲートウェイに必要な機能
NginxをAPIゲートウェイとして使用する。
APIゲートウェイのため、リバースプロキシやロードバランサーとは異なり、以下の機能を持つ必要がある。
- 全てのAPIのセットとして機能し、受信した通信を適切なマイクロサービスのAPIにルーティング
- 認証
- トレースIDの付与
- キャッシュの作成
- リクエストのレートリミット
- パケットのアプリケーションデータの暗号化
- ...
▼ ルーティング
APIゲートウェイとしてのルーティングの機能であれば、難しい実装はいらない。
特定のパスに対するリクエストを特定のAPIにフォワーディングすれば良い。
*実装例*
server {
    listen 80 default_server;
    listen [::]:80 default_server;

    # Products API
    location /api/products {
        proxy_pass http://products.api.com:80;
    }

    # Users API
    location /api/users {
        proxy_pass http://users.api.com:80;
    }
}
- https://marcospereirajr.com.br/using-nginx-as-api-gateway-7bebb3614e48
- https://www.nginx.com/blog/deploying-nginx-plus-as-an-api-gateway-part-1/
- https://www.codingexplorations.com/blog/setting-up-an-api-gateway-using-nginx
- https://github.com/nanit/api-gateway-example/blob/master/app/services/authentication.conf
▼ 認証
Keycloakと連携し、NginxではなくKeycloak側で認証処理を実施する。
Nginx (Keycloakクライアント) は、Keycloakの認可エンドポイントにアクセストークン署名検証リクエストを送信する。
user  nginx;
worker_processes  1;

events {
    worker_connections  1024;
}

http {
    include       /etc/nginx/mime.types;
    default_type  text/html;

    server {
        listen 8080;

        location /keycloak/ {
            proxy_pass          $scheme://<Keycloakのドメイン>/;
            proxy_set_header    Host               $host;
            proxy_set_header    X-Real-IP          $remote_addr;
            proxy_set_header    X-Forwarded-For    $proxy_add_x_forwarded_for;
            proxy_set_header    X-Forwarded-Host   $host;
            proxy_set_header    X-Forwarded-Server $host;
            proxy_set_header    X-Forwarded-Port   $server_port;
            proxy_set_header    X-Forwarded-Proto  $scheme;
        }

        location /keycloak/ {
            # 認可エンドポイントにアクセストークン署名検証リクエストを送信する
            proxy_pass          $scheme://<Keycloakのドメイン>/realms/<realm名>;
            proxy_set_header    Host               $host;
            proxy_set_header    X-Real-IP          $remote_addr;
            proxy_set_header    X-Forwarded-For    $proxy_add_x_forwarded_for;
            proxy_set_header    X-Forwarded-Host   $host;
            proxy_set_header    X-Forwarded-Server $host;
            proxy_set_header    X-Forwarded-Port   $server_port;
            proxy_set_header    X-Forwarded-Proto  $scheme;
        }
    }
}